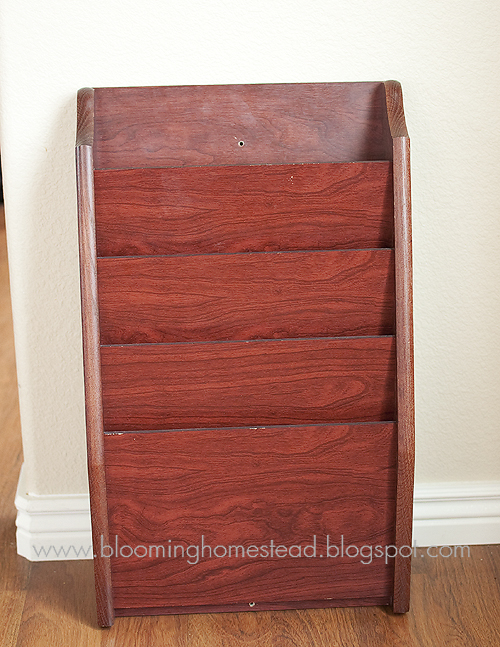
In our new house, we really needed a place to put mail and important papers that we might want on hand, especially with school starting soon. I didn't want them just out looking cluttery or junky so I needed something. I found this hanging file holder at goodwill for a couple bucks.
I sanded it a little, primed and painted it with white paint. Looked good, but kind of plain. I wanted to add a little decorative touch to take it up a notch. I found this candle sconce at salvation army a few months back for like $1.
I just unscrewed the scalloped plate from the sconce and painted it white. It was a dark greenish blue...although you can't tell from the picture. I then painted a coat of lighter blue that I picked out to match my curtains I am going to make. Martha Stewart's Tropical Surf.
I just glued it on the front of the file folder with some liquid nails and now its ready to use! I love how it turned out. It's a good compliment to my desk I just refinished.
I love how it turned out!
I'm join these fabulous link parties each week: Flamingo Toes, I heart naptime, Under the table and dreaming, Not just a housewife, Creating my way to success, Craft Couture, Funky Polkadot Giraffe, Krafty Kat, Polly want a Crafter, Blue Cricket Design,Ginger Snap Crafts, Eisy Morgan, Clean & Scentsible, House of Hepworths, Somewhat Simple, The Shabby Chic Cottage, The Shabby Nest, The Speckled Dog, Tatortots & Jello, Simply Designing, Chic on a Shoestring, Just a Girl
Showing posts with label Redo. Show all posts
Monday, August 15, 2011
Monday, July 18, 2011
Desk Re-do
*First off, thank you so much for your kind, supportive comments and e-mails regarding my last post. It really touched my heart.
Now, onto my first project (since the move). Yeah, so I haven't decorated my house or unpacked all the way (mostly though :)), but I decided that we would keep our desktop in our common area of a house instead of an upstairs bedroom or basement. I don't love our desk though, it is nice and big and sturdy, but not very appealing and I wanted something semi-dainty to have tucked away against the wall where I could just set the wireless mouse and keyboards in the drawer and leave the desk mostly cleaned off. So basically I want to have computer access without the office mess and nonsense that accompanies it. Which means my files and crafts and all my other stuff will be upstairs, but the desktop computer will be downstairs. Anywho, I found this beauty at Salvation Army.
My husband about croaked when he saw it! He couldn't believe I would buy it. I actually thought it was kind of cute. Of course, our son's room is a rustic western-ish theme and I just like it. Anyways, I just took the good ole' sander to it and sanded the decals down. I was going to paint it all white, but as I sanded I just fell in love with the worn top so I decided to stain it. I did a spray KILZ primer and sprayed it heirloom white. I am not sure why, but the paint was coming out in splatters. It was a mess and looked awful. Now, I don't have a air-painter sprayer thing, so I sanded it down again, re-primed it by hand and then painted it by hand in a flat white color by glidden. I then got the nobs for the drawers at hobby lobby for $2.99/each. I thought they kind of kept the style without being too plain. Anyways, here's how she looks now, just waiting for me to unpack the computer!
I'm join these fabulous link parties each week: Flamingo Toes, I heart naptime, Under the table and dreaming, Not just a housewife, Creating my way to success, Craft Couture, Funky Polkadot Giraffe, Krafty Kat, Polly want a Crafter, Blue Cricket Design,Ginger Snap Crafts, Eisy Morgan, House of Hepworths, Somewhat Simple, The Shabby Chic Cottage, The Speckled Dog, Tatortots & Jello, Simply Designing, Chic on a Shoestring, Just a Girl
Now, onto my first project (since the move). Yeah, so I haven't decorated my house or unpacked all the way (mostly though :)), but I decided that we would keep our desktop in our common area of a house instead of an upstairs bedroom or basement. I don't love our desk though, it is nice and big and sturdy, but not very appealing and I wanted something semi-dainty to have tucked away against the wall where I could just set the wireless mouse and keyboards in the drawer and leave the desk mostly cleaned off. So basically I want to have computer access without the office mess and nonsense that accompanies it. Which means my files and crafts and all my other stuff will be upstairs, but the desktop computer will be downstairs. Anywho, I found this beauty at Salvation Army.
My husband about croaked when he saw it! He couldn't believe I would buy it. I actually thought it was kind of cute. Of course, our son's room is a rustic western-ish theme and I just like it. Anyways, I just took the good ole' sander to it and sanded the decals down. I was going to paint it all white, but as I sanded I just fell in love with the worn top so I decided to stain it. I did a spray KILZ primer and sprayed it heirloom white. I am not sure why, but the paint was coming out in splatters. It was a mess and looked awful. Now, I don't have a air-painter sprayer thing, so I sanded it down again, re-primed it by hand and then painted it by hand in a flat white color by glidden. I then got the nobs for the drawers at hobby lobby for $2.99/each. I thought they kind of kept the style without being too plain. Anyways, here's how she looks now, just waiting for me to unpack the computer!
I'm not sure why, but I love this worn, beaten desk top!
I'm join these fabulous link parties each week: Flamingo Toes, I heart naptime, Under the table and dreaming, Not just a housewife, Creating my way to success, Craft Couture, Funky Polkadot Giraffe, Krafty Kat, Polly want a Crafter, Blue Cricket Design,Ginger Snap Crafts, Eisy Morgan, House of Hepworths, Somewhat Simple, The Shabby Chic Cottage, The Speckled Dog, Tatortots & Jello, Simply Designing, Chic on a Shoestring, Just a Girl
Labels:
Before and Afters,
desk,
furniture,
home projects,
Redo,
Tutorial

Thursday, February 17, 2011
Nightstand Redo
While browsing salvation army one day I came across this little gold nightstand. I liked the lines of it and so I picked it up. It cost about $11 bucks which was a little more than I wanted to spend but I liked it so I went with it. Here's how it started out.
I pulled out my sander and went to town. I removed the front detail to sand and get rid of some of the gold. After I sanded it down I primed and painted it white.
Here's how she looks now. I added a little distress ink to the edges but just softly. I love how it turned out, I only wish that I could have found another one to match!


I pulled out my sander and went to town. I removed the front detail to sand and get rid of some of the gold. After I sanded it down I primed and painted it white.
Here's how she looks now. I added a little distress ink to the edges but just softly. I love how it turned out, I only wish that I could have found another one to match!
linking to:
Wednesday, April 28, 2010
Online Mirror- Bedroom Wall Mirror
This is one of my cute projects I wanted to share. When I found this mirror it was in sad condition at the peddlers mall. It was originally a brass frame (I think) but was then painted with a pinkish type of paint that almost felt like fingernail polish. It was all over the mirror. Then someone painted it gold after the pink. It has a texture to it, I am not sure if that was just a result of some crappy paint jobs or what, but even in this ugly gold mirror I saw potential. With a little spray paint, I knew it would be perfect in my bedroom that I am working on re-doing. So I bought this sad little mirror and about an hour later, I had my new wall find that fits in my damask bedroom perfectly!! If my walls wouldn't have been painted white I would have probably painted it heirloom white. But that black worked out great. Just goes to show that even ugly ducklings have potential right?
Tuesday, April 27, 2010
New Find
Look at this cute new find I got today at the thrift store! Totally has potential right? Its small, but I think it is going to look awesome with a little of my favorite heirloom white spray paint and a little distressing. I am not sure what picture I will put in it yet, but I think its adorable and my shelf will love this new addition! I will post pics when its done.
Subscribe to:
Posts (Atom)