I am still enjoying Christmas vacation. I have 1 more week before I am going back to reality:). Hence the reason my blog is still 'Christmas' themed. Even though I am on vacation, I am still planning ahead. I have a few calendars I use, but I always make a custom one to have handy with my organizational system that I can write on as needed. I thought I would share it here in case anyone else would like to use it to. Either click on the calendar or go here to download the pdf. I'll try and post my monthly calendars each month. Enjoy.
Wednesday, December 29, 2010
Monday, December 13, 2010
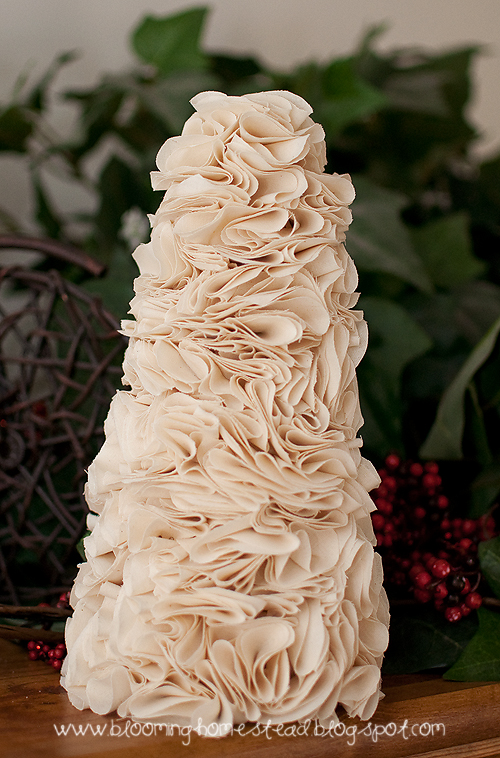
Ruffle Tree
Another ruffle tree I made to accent my bead tree. It was a bit more time consuming but I love how it turned out. Here are my supplies. I got a styrofoam from HL with a 40% off coupon and a yard of natural muslin. You could also use felt or another fabric but I wanted a daintier look than felt offers so I went with muslin. I also used satin pins...not showed here, I had those already.
First cut out lots of circles. I was not precise. I just cut a general circle maybe like 2" in diameter roughly. Not all were the same size, just close to the same size. This takes LOTS of circles. I did like 3 different stacks like the one below. It depends on how full you want it.
Take your circle, fold in half, then in half again. Put the pin in the end and push into the styrofoam. As you go you can turn and twist the direction of the ruffled circles to get the look your going for.
Still in progress...
Here is my finished product, I love it. I love it so much that I think this baby may stay out after Christmas. I really love it.
Now I gotta get my house cleaned, laundry done, gifts wrapped, and my bags packed because we head on vacation in 2 days! I'm so excited! I will probably be pretty MIA here though until January! I might pop in but for the most part it will be family time.
linking to:


Friday, December 10, 2010
Affordable Gift Idea
I usually have to get really creative when gift giving on a student loan budget. I wanted to find something to give that was practical, affordable, and not crap. :)
I found these little notebooks at Hobby lobby for $1.99 a set. I think they are adorable and I LOVE these. One is a little notepad that you could fit in your purse, the taller one has a magnet on the back, perfect for the fridge. I bought these and some little candies to give as gifts.
I found these brown bags at hobby lobby 2/$1.00. I bought the tissue that was normally $3.99 for 50% off. Which I will have tons leftover to use for other things. I wanted to keep things simple. I made some gift tags in photoshop you can download here. I like to share! (Like with all my designs...I am NOT a designer, I just like to do it for fun.) I also used raffia which I didn't take a picture of. I always have raffia on hand.
Got my handy dandy 2" scallop punch and punched out my tags. I use this baby for cupcake toppers and party labels as well.
I then got my hole punch and punched 2 holes to thread my raffia through.
I threaded the raffia through the holes with the tag on it, and then back behind and through the holes again to tie in front. Make sense? I know I am horrible at describing. Here's a pic.
And there you have it.
I just wrote on the back, but planned to maybe add a little notecard inside with the gift.
Cute and simple and affordable!
Linking to:

Wednesday, December 8, 2010
Wish List
I really want to upgrade to this Nikon d700. I am really loving its high ISO capabilities for my low light situations. Plus, I feel ready to move to full frame. However, my Nikon d90 is an amazing camera and really meets all of my needs for now so there is not logical reason to spend a couple grand on an upgrade right now.
Nikkor 24-70mm 2.8 I rent this lens for large family portrait sessions because it is fairly fast, great focus, and beautiful bokeh!
Nikkor 85mm 1.4 I really love my prime lenses and would love this focal length.
A sillouette...I could use this baby for home projects, decor, kids crafts, church handouts, and I could use it in my photography packaging as well. I "need" one if only the hubby would agree:).
I have been eyeing this table for quite some time, it is gorgeous (and I'll never be able to afford it but I can dream!)
And since I'm bearing it all why not add...
I actually think these last few items would top my list. Things are different for us this year. After almost 9 years of my husband going to school he will be done in 7 months. This is crazy to think about! We will finally be settling down and hopefully will land a good practice opportunity. I dream of having a home to call our own that we can really settle into and know we are not going to be "moving in 2 years so whats the point". Last but not least, I would love to bring another child to our home. We are hoping with a new job and a real income we can possibly make that happen in the next few years. It is something we dream and pray for daily. Even though I have my "Wants", I know that I am so blessed and have been given so much.
Monday, December 6, 2010
Chocolate Covered Pretzel Rods
Today I am sharing how to make these Chocolate Covered Pretzel Rods. These are so easy and are a hit at every party!
These are so simple to make and everyone loved them! They were one of the first things to go. I am sure there are many ways to make this, but here is how I did it. (I decided to use candy wafer melts instead of chocolate but the process is pretty much the same.)
First I got my supplies, a glass bowl for melting the candy wafers, spatula to stir, pretzel rods to dip, wax paper to put them on after they are dipped, and sprinkles for cuteness. (I sometimes worry the candy melts are too waxy but these worked wonderfully and tasted fantastic!)
First off, melt your candy melts according to package directions. Usually on half heat for 30 seconds intervals stirring in between each interval. These can be tricky because you think they are not melting but if you keep stirring they start melting. Otherwise you might overcook and the candies will seize...which is not good. After your candies are melted smoothly start dipping. Because I used a large bowl, I had to use my spatula to help cover the pretzel rods. I would spoon the melt over the rod and then hold onto 1 end of the pretzel rod and 'shake' down the excess off the end. This may sound confusing but you'll know what I am talking about if you try it. This will smooth out the candy on the rod and the excess will drip off the bottom. At this point you can set them on the waxed paper.
I did a few at a time and then just sprinkled them with the candy melt still fresh. It took a few minutes for the candy to set up and so I was able to do several rods before I sprinkled a bunch. Super easy. Then just let them set up (maybe 20 minutes? probably depends on your house temp and location) and you're good to go. I stacked these on a platter and they were a hit! Of course, anything that is salty and sweet is good in my book. :)
Want updates and spoilers on projects and ideas? Come like me on facebook , twitter, and Google + to keep up on whats up next!


Thursday, December 2, 2010
Christmas Party
NOTE:pardon my pics...it was late and so I had no natural light. I hate that but it is what it is.
The past few days I have been super busy getting ready for our Christmas Party we put on for the young women in our ward. We do a progressive dinner at different leaders houses and mine was the last stop. I decided to make it extra cute. I decided to do red and light blue with snowflakes for my theme. First off I
went right to photoshop and starting making my cupcake toppers, labels, and banner. I went too hobby lobby and found a few things to add in as decor like these red berries below.

One of the leaders brought these delicious brownie cups!


Red velvet mini cupcakes I found at walmart last minute and decided I had to add them in. :)
Covered pretzel sticks. I will post how I made this later today or tomorrow. Everyone raved about these.
Details.


These were my "gifts" to everyone that came.
I wrapped up my husbands Xbox box to decorate the table. He was
These tissue balls are so fun and pretty easy. I made a tutorial on these for halloween. Click here to learn more.
We had wassail, but I also had these mini water bottles for those of us who don't like wassail. Overall I think everyone had a great time!
I'll be posting a little tutorial for making my Merry Christmas Banner today or tomorrow and will offer some free printables!
Subscribe to:
Posts (Atom)


