Showing posts with label Crafts. Show all posts

Wednesday, January 12, 2011

Valentine Hearts

Today I am sharing these cute Valentine Hearts. I love creating simple art, and these  Valentine Hearts were perfect for some Valentine Art!
I found these cute little hearts at hobby lobby last week and had to buy them. Aren't they cute? Little did I know that all the valentine crafts are on sale 50% this week. Wish I would have waited...oh well. Full price for a box of them was $3.99. Not too bad. Here's a teaser and little tutorial...
First off, I found a frame I wanted to use. Remember this frame from November? 

I love it, I want to leave the vinyl on it for now...I know its only vinyl but I really like it and actually have it in my bedroom even though Thanksgiving has long since passed...I like the message:) (I know I am lame!). Anyways, I love the frame and knew I wanted to use it again. Got my supplies: hearts, white cardstock, and handy dandy glue gun.

I cut the cardstock to fit the frame opening. Then I organized the hearts in a trial run layout and made sure they would fit.
Cue glue gun...
Done in like 5 minutes and I love it! Don't you just love these Valentine Hearts?
I think it turned out pretty darn cute. :)

Monday, December 13, 2010

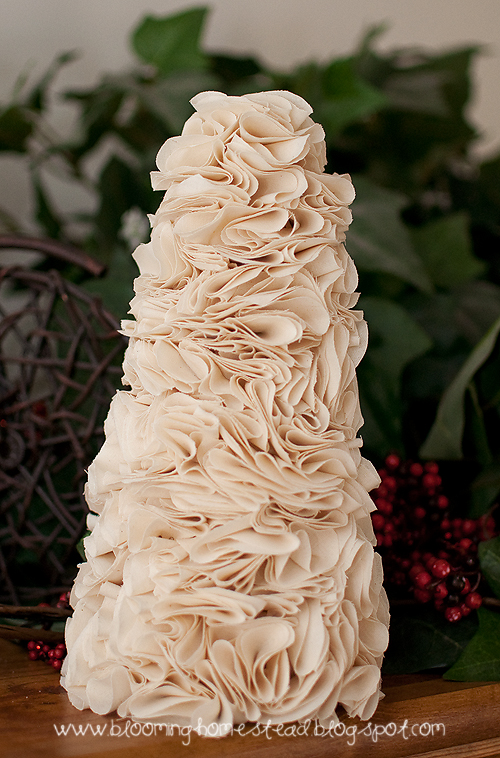
Ruffle Tree

 Another ruffle tree I made to accent my bead tree. It was a bit more time consuming but I love how it turned out. Here are my supplies. I got a styrofoam from HL with a 40% off coupon and a yard of natural muslin. You could also use felt or another fabric but I wanted a daintier look than felt offers so I went with muslin. I also used satin pins...not showed here, I had those already.

First cut out lots of circles. I was not precise. I just cut a general circle maybe like 2" in diameter roughly. Not all were the same size, just close to the same size. This takes LOTS of circles. I did like 3 different stacks like the one below. It depends on how full you want it.
Take your circle, fold in half, then in half again. Put the pin in the end and push into the styrofoam. As you go you can turn and twist the direction of the ruffled circles to get the look your going for.
Still in progress...


Here is my finished product, I love it. I love it so much that I think this baby may stay out after Christmas. I really love it.


Now I gotta get my house cleaned, laundry done, gifts wrapped, and my bags packed because we head on vacation in 2 days! I'm so excited! I will probably be pretty MIA here though until January! I might pop in but for the most part it will be family time.

linking to:

Making

Keeping It Simple

Monday, November 22, 2010

Beaded Tree- Ballard Inspired

 Well, I got my Ballard catalog in the mail and fell in love with so many things! My Christmas tree is cream and white gold sparkly so when I saw their holiday collection it just made me smile! I especially loved the Mariana Button Tree. I don't love the price of $79 bucks though! I was inspired to come up with something similar. I looked all over for the perfect buttons, but couldn't find the right shade in bulk so while laying in bed I remembered this bead pearl garland I bought for my tree from hobby lobby a few years ago. I got it home and put it on my tree and it just wouldn't hang right so it went into a baggie and hasn't been out since.
Perfect!

I had a foam tree that I spray painted and added a few sparkles.
I decided to leave the beads on the strand and just wrap around and glue them down with hot glue.
Easy, easy, keep on wrapping.
Finished up and added a long bow ribbon on top. I love it, and it matches my tree perfectly! I will be posting my holiday decor pics soon, hopefully before we head out on vacation this week starting tomorrow! What I also love is that this was practically free! I used everything I had on hand from my stash. 
linked to


Making
The Girl Creative
Photobucket
Today's Creative Blog


HookingupwithHoH

Monday, November 15, 2010

Scrap Ribbon Christmas Tree

Christmas Already?? You bet!

I made this cute little scrap ribbon tree the other day. I only used things I had on hand. I think it turned out really cute and would make a fun gift. I really like how it turned out. First I gathered random scraps. White broadcloth fabric, white organza fabric, various ribbons, and my bedazzler (I know, welcome to the 80's). I actually just received the bedazzler in October as a birthday gift. LOL
I took a piece of scrapbook paper and fit it to my frame backing, I did not use the glass. After that I just cut out a little Christmas tree by hand in the cotton and fit it to my cheap 8x10 frame I had lying around. I frey-checked the edge just to prevent major freying.


I wanted to give it a little kick so I found some white organza in my stash and cut out the tree to match. It wasn't perfect, but I was going for the imperfect scrappy look. Next I cut out the various ribbons and rick rack I had into different lengths across my tree.
 I started glueing them down and then came the bedazzler! I grabbed a few styles and randomly added them as "ornaments" to my ribbon tree.
Then I glued the whole tree onto the paper in frame. I really love it, its quite adorable and unique. Better yet it cost me $0 using all stuff I had on hand! These would make a fun gift.
linking to:


Keeping It Simple
The Girl Creative
Making
Today's Creative
Show and Tell Green


giveaways
HookingupwithHoH
Join  us Saturdays at tatertotsandjello.com for the weekend      wrap    up           party!

Saturday, November 6, 2010

Craft Talk

I was working on a project with my bedazzler (oh yeah!) this morning and came across this you tube video. I thought it was too funny, I had to share. I have seen this lady on Yo Gabba Gabba before in all her gold tight glitter. Its great! Make sure you have the volume on for the song.

Thursday, October 28, 2010

I'm thankful for...

So I know I am jumping the gun, since I still have some Halloween projects going on, but this is something I wanted to have ready for monday, Nov 1st. I made a thankful tree, each day at dinnertime we will take a leaf and write a blessing we are thankful for in our lives. I really want to recognize as a family all we have to be grateful for and there's no better time! At first this was just going to be a random thing on our fridge, but I decided that unless it was "cutes-ied"yes I make up words up, it would bother me so I went to work making it a little cuter. This was super easy though and I am happy with how it turned out.
First I took some craft foam I already had, most people would probably use paper since we will probably throw away the leaves and start anew next year anyways, but I had the foam and decided to go with it.
 First I took brown and cut my tree and branches.
Then I cut out various colors and shapes of leaves. I am sure most people with a cool cricut or silhouette (I'm saving for one!), can cut these quick, but since I don't have one and the only leaf punch I have is small...I did it by hand. Didn't take too long. I even went out into the yard to find my "stencil".
I cut out yellow, orange, and red leaves. (don't judge...I am horrible and cutting recognizable shapes!) Then I went and found an empty frame I had laying around that would fit my tree. I found this 10x20 frame I have been meaning to use and hadn't and thought it would be perfect! 
Next I just printed a little tag to adhere to the tree base. I burnt the edges since I didn't want to dig out my ink I know so lazy!. Then I punched a little hole and tied the tag around the tree base with raffia. I then taped the tree onto the scrapbook paper in the frame. It hung out the frame...which is kind of how I wanted it so I chose not to trim it. I just thought it looked cool like that especially when we add the leaves to it.
Now my "thankful" tree is all ready to go for Monday!
linked to
House of Hepworths
Somewhat Simple
The Shabby Chic Cottage
Pony Tails & Fish Scales
The Shabby Nest
Fun to Craft
Chic on a Shoestring Decorating
TatorTots & Jello 

Visit thecsiproject.com
 
BLOG DESIGN BY DESIGNER BLOGS