Showing posts with label Before and Afters. Show all posts

Friday, August 31, 2012

Old Chair revamped into New!

I can't wait to share with you todays project! A few years ago our local church was getting rid of all their old chairs and giving them away free. I snagged 4 of them because they really are handy to have around and quite sturdy. I just kept them in our basement, but one corner of my sitting room needed another chair so I was using one of my reds. It was so worn, nasty, just gross. I have been meaning to recover it forever and when my sister was visiting we finally got to it! Check it out!

 Started out with yucky red chair:
 
 Unscrewed the cushions off to bare wood.
Primed and painting wood.
Next selected some new foam and fabric to add to original chair cushion for extra fluff and cuteness.
I just traced out the foam and cut the fabric roughly around.
Next, we got out the staple gun and wrapped the fabric around tightly creating pleats at the edges of the chair so that the fabric would be smooth and not bunched.
Staple, staple, staple
Screw cushions back on chair and ya got a brand new lookin' chair! Super easy and what a difference! Plus if I get sick of the trendy yellow chevron, it would take under an hour to recover it easy once again!
What do ya think? I can't wait to do the rest, even if they are just hanging in the basement for now. :)
FYI, don't mind my dustbunnies...lol, just keeping it real!

Want updates on projects and ideas? Come like me on facebook and twitter to keep up on whats up next! I am working on 2013 items and will keep you updated so be sure to stay tuned!

I'm join these fabulous link parties each week: Flamingo Toes,  I heart naptime, Under the table and dreaming, Not your ordinary Recipes, Not just a housewife, The Project Queen, Creating my way to success, Craft Couture, Funky Polkadot Giraffe,The Kurtz Corner,  Krafty Kat, Polly want a Crafter, Blue Cricket Design, Southern Lovely, Ginger Snap Crafts,  Women who do it all, Eisy Morgan, Laugh, Love, Craft,  Clean & Scentsible,  House of Hepworths, Somewhat Simple, The Shabby Creek Cottage, The Shabby Nest, The Speckled Dog, Tatortots & Jello, Simply Designing, Chic on a Shoestring, Just a Girl ,Someday Crafts, Reasons to skip the housework,  The Idea Room ,Between U and Me,   Home Saavy
Pocket full of pink,  For the love of cupcakes, Positively Splendid,  Raising 4 Princesses , One Stop Shoppe,Oopsey Daisy
 Its Overflowing, The D.I.Y. Dreamer ,Serendipity & Spice, Rae Gun Ramblings, ,Crafty blog stalker , CSI Project,
36th Avenue, Real housewives of Riverton

Sunday, June 24, 2012

Painted Metal Chairs

Every year my parents host a 4th of July party, it is always a blast and we look forward to it every year. This year my Mom decided to have a little fun with some of their rusty metal chairs we use. Here is the before:

Now for a little of this:
And the finished product (well, almost...we still have some more chairs to do in aqua blue but they didn't have that color of spray paint that day)
  

So cute right? I am loving how colorful and fun they are! Such a quick and easy fix to make for some outdoor entertaining. I hope you're all having a great summer! We have been super busy and so far there seems to be no sign of it stopping. I can't believe it is almost July.

I'm join these fabulous link parties each week: Flamingo Toes,  I heart naptime, Under the table and dreaming, Not your ordinary Recipes, Not just a housewife, The Project Queen, Creating my way to success, Craft Couture, Funky Polkadot Giraffe,The Kurtz Corner,  Krafty Kat, Polly want a Crafter, Blue Cricket Design, Southern Lovely, Ginger Snap Crafts,  Women who do it all, Eisy Morgan, Laugh, Love, Craft,  Clean & Scentsible,  House of Hepworths, Somewhat Simple, The Shabby Creek Cottage, The Shabby Nest, The Speckled Dog, Tatortots & Jello, Simply Designing, Chic on a Shoestring, Just a Girl ,Someday Crafts, Reasons to skip the housework,  The Idea Room ,Between U and Me,   Home Saavy
Pocket full of pink,  For the love of cupcakes, Positively Splendid,  Raising 4 Princesses , One Stop Shoppe,Oopsey Daisy
 Its Overflowing, The D.I.Y. Dreamer ,Serendipity & Spice, Rae Gun Ramblings, ,Crafty blog stalker , CSI Project

Friday, May 11, 2012

Gold Mirror Re-do

After living here almost a year...I am finally getting a sense of what I want to hang where. I really haven't done much decorating, and in a way I think it has been good to 'live' in this space and figure out what I really want, and what will really work for our home. Our entry is small and I just had this little table with flowers on it, but it needed something.
I headed up to my 'junk' room where everything I haven't unpacked is including all our decorations and my thrift store finds. I came across the perfect gold mirror.
The gold is not my style, but with a little primer and paint...it turned out perfect. I love it, the perfect addition to my small entry. (plus it feels good to finally start making our home our own!)


Thursday, May 3, 2012

Vase Redo with Jute

 Wanna take a boring plain glass vase and give it something special? How about using jute?

So cute right? I got my jute from website that does wholesale and the prices are great. Go to http://burlapfabric.com/    There prices are great and they shipped fast too. Really great to work with and they have so many fun options including burlap coffee bags, burlap webbing (so plan on getting some of this), cheesecloth, jute and sisal twine. You should totally check them out! I use jute for so many things, wrapping gifts, decorating, hanging things. Here is a basic tutorial on how I created did this vase-redo.

Tuesday, August 30, 2011

Old Crate Re-do

Well, I officially have a Kindergartner now! It was an emotional week. He started last Wednesday so we spent the first couple days before school having a special day. I took him to 2 different dinosaur museums, out to eat, shopping, craft time, and 2 parks. It was exhausting but I wanted to spend some special time with him. With him in school, I have mostly spent time catching up on work! But I have also worked on some little projects like this crate I found at salvation army. You can't tell...but it was slightly green tinted to begin with. An ugly green I might add...

I have been looking for a way to store a couple throw blankets to have on hand while we watch tv. We have to have our blankets...not sure why but we do! We usually grab some from upstairs but they always seem to never get put away. I found some really soft off-white throws and they fit into the crate perfectly!
I used the Martha Stewart Accent paint I bought to match my curtains that I plan to make eventually. Same paint used on the sconce I put on my mail/paper organizer. It was Martha Stewarts Tropical Surf.
Now I have a cute, subtle throw holder that is so cute and effective!

P.S. September calendar coming later today!

I'm join these fabulous link parties each week: Sweet Little Gals, Flamingo Toes,  I heart naptime, Under the table and dreaming, Not just a housewife, Creating my way to success, Craft Couture, Funky Polkadot Giraffe, Krafty Kat, Polly want a Crafter, Blue Cricket Design,Southern Lovely, Ginger Snap Crafts, Eisy Morgan, Clean & Scentsible,  House of Hepworths, Somewhat Simple, The Shabby Creek Cottage, The Shabby Nest, The Speckled Dog, Tatortots & Jello, Simply Designing, Chic on a Shoestring, Just a Girl

Monday, August 15, 2011

Mail & Paper Organizer

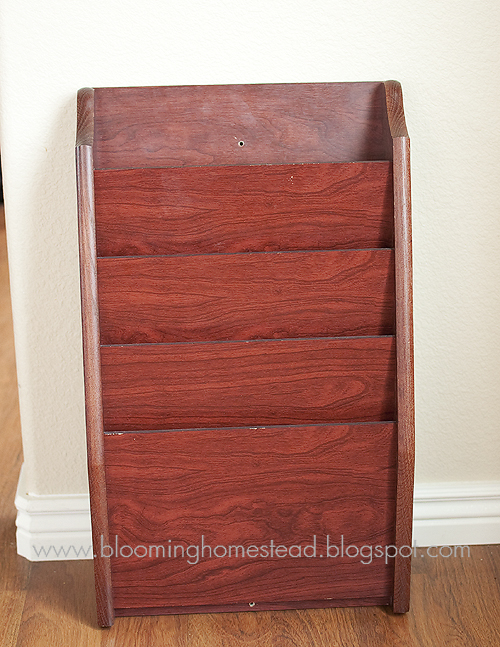
In our new house, we really needed a place to put mail and important papers that we might want on hand, especially with school starting soon. I didn't want them just out looking cluttery or junky so I needed something. I found this hanging file holder at goodwill for a couple bucks.
I sanded it a little, primed and painted it with white paint. Looked good, but kind of plain. I wanted to add a little decorative touch to take it up a notch. I found this candle sconce at salvation army a few months back for like $1.
 I just unscrewed the scalloped plate from the sconce and painted it white. It was a dark greenish blue...although you can't tell from the picture. I then painted a coat of lighter blue that I picked out to match my curtains I am going to make. Martha Stewart's Tropical Surf.
I just glued it on the front of the file folder with some liquid nails and now its ready to use! I love how it turned out. It's a good compliment to my desk I just refinished.
I love how it turned out!

I'm join these fabulous link parties each week: Flamingo Toes,  I heart naptime, Under the table and dreaming, Not just a housewife, Creating my way to success, Craft Couture, Funky Polkadot Giraffe, Krafty Kat, Polly want a Crafter, Blue Cricket Design,Ginger Snap Crafts, Eisy Morgan, Clean & Scentsible,  House of Hepworths, Somewhat Simple, The Shabby Chic Cottage, The Shabby Nest, The Speckled Dog, Tatortots & Jello, Simply Designing, Chic on a Shoestring, Just a Girl

Monday, July 18, 2011

Desk Re-do

*First off, thank you so much for your kind, supportive comments and e-mails regarding my last post. It really touched my heart.

Now, onto my first project (since the move). Yeah, so I haven't decorated my house or unpacked all the way (mostly though :)), but I decided that we would keep our desktop in our common area of a house instead of an upstairs bedroom or basement. I don't love our desk though, it is nice and big and sturdy, but not very appealing and I wanted something semi-dainty to have tucked away against the wall where I could just set the wireless mouse and keyboards in the drawer and leave the desk mostly cleaned off. So basically I want to have computer access without the office mess and nonsense that accompanies it. Which means my files and crafts and all my other stuff will be upstairs, but the desktop computer will be downstairs. Anywho, I found this beauty at Salvation Army.
 My husband about croaked when he saw it! He couldn't believe I would buy it. I actually thought it was kind of cute. Of course, our son's room is a rustic western-ish theme and I just like it. Anyways, I just took the good ole' sander to it and sanded the decals down. I was going to paint it all white, but as I sanded I just fell in love with the worn top so I decided to stain it. I did a spray KILZ primer and sprayed it heirloom white. I am not sure why, but the paint was coming out in splatters. It was a mess and looked awful. Now, I don't have a air-painter sprayer thing, so I sanded it down again, re-primed it by hand and then painted it by hand in a flat white color by glidden. I then got the nobs for the drawers at hobby lobby for $2.99/each. I thought they kind of kept the style without being too plain. Anyways, here's how she looks now, just waiting for me to unpack the computer!
I'm not sure why, but I love this worn, beaten desk top!

I'm join these fabulous link parties each week: Flamingo Toes,  I heart naptime, Under the table and dreaming, Not just a housewife, Creating my way to success, Craft Couture, Funky Polkadot Giraffe, Krafty Kat, Polly want a Crafter, Blue Cricket Design,Ginger Snap Crafts, Eisy Morgan, House of Hepworths, Somewhat Simple, The Shabby Chic Cottage, The Speckled Dog, Tatortots & Jello, Simply Designing, Chic on a Shoestring, Just a Girl

Thursday, March 17, 2011

DIY Vase

I love adding in touches of Spring to my home. This year has been a little more tricky with my commitment to stop buying more supplies and decor, and try to re-use what I have. Well, one morning after breakfast I was looking at our empty OJ container and I thought, "I love the shape of this", next thing I know I was ripping off the labels and priming it!
First off, rip off the sticker and wash it out.
I took my metal cutters (only thing that would cut it) and cut off the top where the lid screws on. I was going to sand this to be a cleaner edge, but I got lazy and figured it wouldn't be that noticable.
Next off came my primer. I used what I had on hand which was a kilz oil based primer. I coated it a few times. After that I got my blue paint sample I had for a spring sign I coated a few coats on. It still felt like it needed something so into the craft room I went hunting.
Ah...perfect!
Next up I needed vase filler and decided to go Mathew Mead style with blossom branches. I went out the backdoor about 2 steps on the patio and found my branch with several twigs to use!
I broke off a few of the small branches and went inside to find some blossoms.
I had this stem as a leftover to a floral arrangement I made. I thought it would be perfect so off came the blossoms. Just a light tug brought them off their stems.
I just glued them on randomly 1 by 1 with hot glue. Most of them fit onto the new spring buds from the fallen branch so they were quite secure.
Super Easy and I love the final product all put together and Spring-y!


P.S. I have some adorable free Spring Printables coming up!

Thursday, February 17, 2011

Nightstand Redo

While browsing salvation army one day I came across this little gold nightstand. I liked the lines of it and so I picked it up. It cost about $11 bucks which was a little more than I wanted to spend but I liked it so I went with it. Here's how it started out.

I pulled out my sander and went to town.  I removed the front detail to sand and get rid of some of the gold.  After I sanded it down I primed and painted it white.
Here's how she looks now. I added a little distress ink to the edges but just softly. I love how it turned out, I only wish that I could have found another one to match!


linking to:


HouseofHepworths
giveaways

Transformation Thursday

Join  us Saturdays at tatertotsandjello.com for the weekend wrap 
 up           party!


BLOG DESIGN BY DESIGNER BLOGS